Prevent decking failures with essential moisture protection tips from Trex
Decks are central to outdoor living, but moisture-related failures are a constant threat in our damp climate. Rotting ledger boards, weakened joists, and corroded fasteners can all compromise the safety and longevity of a deck. For builders, taking proactive steps to manage moisture is key to ensuring a deck that lasts.
How to Build a Moisture-Resistant Deck
How long a deck lasts depends heavily on factors like material choice, construction quality, and exposure to the elements – including moisture. While water exposure is unavoidable, the right materials and construction methods can help ensure the long-term durability of your deck projects. By taking these proactive steps, you can extend deck lifespans, reduce callbacks, and protect your reputation.
Select the Right Decking & Hardware
Choosing materials that withstand constant exposure to damp conditions is critical for long-term deck durability. In our climate, composite decking is often the most practical choice over traditional timber, thanks to its moisture resistance, stability, and low maintenance needs. Unlike wood, composites won’t absorb water, split, or rot, making them ideal for high-exposure areas.
For projects where timber is preferred, high-quality hardwoods can offer better moisture resistance than softwoods, though they still require sealing. Pressure-treated softwood remains the most budget-friendly option, but it will demand ongoing maintenance by your clients to prevent decay.
Pro Tip: For maximum moisture protection, seal all cut ends of timber decking with an appropriate end-grain sealant. This prevents water absorption, which can lead to premature rot and splitting – especially in softwoods.
Equally important is selecting the right hardware. Fasteners, brackets, and connectors are vulnerable to corrosion in damp conditions, which can weaken structural integrity over time. Using corrosion-resistant options, such as stainless steel or hot-dip galvanised hardware, ensures long-term durability and reduces the risk of rust-related failures.
Tip #2: Fully Seal the Ledger & Sub-Ledger

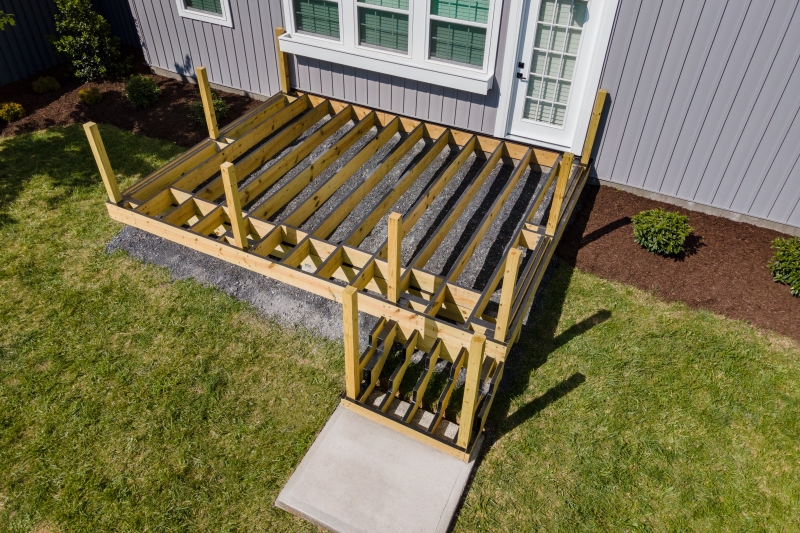
The ledger board is the most failure-prone structural component of an attached deck, with moisture infiltration being one of the biggest culprits. If water seeps behind the ledger, it can weaken fasteners, accelerate wood rot, and undermine the deck’s structural integrity.
Don’t overlook the sub-ledger area, either. Moisture can collect behind the ledger board, seeping into the building envelope and leading to hidden decay. Over time, this can cause issues not just for the deck but for the house itself.
To help prevent these water-related problems, use butyl flashing tape to create a watertight barrier. Trex Seal offers tape solutions for both the ledger and sub-ledger, sealing fastener penetrations on the face of the ledger and protecting the area behind it where water often collects. Unlike traditional metal flashing, these tapes feature an aluminium lining, which helps prevent slumping and ensures they stay in place without slipping.
Pro Tip: When installing Trex Seal Ledger Tape, fold it in half and remove one release liner to adhere it to the vertical surface. After securing, remove the second liner and press firmly against the ledger.
Tip #3: Shield the Substructure with Protective Tape

Joists, beams, and bearers support the weight of the deck. If moisture weakens them, sagging or structural failure can follow. By covering the tops of joists, beams, and bearers before installing decking boards, you create a protective barrier that minimises water penetration at these vulnerable points.
Keep moisture out by covering all joints where joists meet the bearer, rim board, or blocking with overlapping waterproof tape. This helps create a continuous barrier, preventing water from seeping into exposed timber connections.
Pro Tip: Use a high-quality joist tape like Trex Protect to not only shield the substructure from moisture but also seal around fasteners, reducing water intrusion at key connections while providing better screw hold than acrylic or asphalt-based tape.
Tip #4: Design for Drainage and Ventilation
Water should always have a way to drain away from the deck structure. Gaps between decking boards are a given, but ventilation beneath the deck is equally critical.
For ground-level decks, a minimum clearance of 150mm between the underside of the joists and the ground is typically recommended to allow for air circulation and prevent moisture buildup. On raised decks, ensuring open airflow through skirting or fascia vents can help keep the substructure dry.
For elevated decks, an under-deck drainage system can provide an added layer of water management, diverting water away from the deck’s foundation through a trough-and-gutter system and exiting via a downpipe. This approach keeps the area beneath the deck dry, protecting the supporting structure from excess moisture while also making the space usable for storage or as an additional outdoor living area.
Pro Tip: An over-the-joist solution like Trex RainEscape channels water away while also covering the joists, preventing direct water contact and reducing the risk of moisture damage to the structural components.
Built Dry, Built Right

A well-built deck isn’t just about appearance – it’s about durability. Even the best-looking deck won’t stay that way if rot sets in due to poor water management. And when that happens, it’s not just your client’s problem – it’s yours too.

Prioritising smart material choices, effective waterproofing, proper drainage, and adequate ventilation from day one means fewer failures, fewer callbacks, and decks that hold up beautifully season after season. By prioritising moisture protection, you’re ensuring better builds and a reputation that stands as strong as your decks.
For further information on Trex RainEscape visit Trex RainEscape® Under-Deck Drainage System | Trex.
To find a Trex stockiest near you visit: Trex® Decking Dealer & Distributor Locator | Trex.


