Bushboard walks us through installing its redeveloped Alloy kitchen splashback range.
Bushboard has reimagined its kitchen splashback offering with its upgraded Alloy range. This new collection lets builders and kitchen fitters offer a range of splashbacks, which can be used as a cost-effective option for a quick kitchen update.
A luxury finish
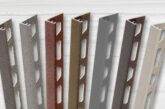
Divided into Alloy Décor and Alloy Colour, the revamped collection boasts 27 designs, including marble, stone, wood and industrial concrete looks, available in four varying sizes. The range has been developed to suit a range of design briefs with the added ease of versatility regardless of the shape or size of the space.
Alloy Décor offers 14 luxurious patterned designs inspired by natural elements, ranging from wood and stone to a style that emulates the look of tiles. The collection consists of 11 new designs alongside 3 of Bushboard’s bestsellers.
Alloy Colour is completely new and has 16 striking solid colour options. These range from light to dark, featuring both gloss to matt finishes and are influenced by nature. These are accompanied by four brushed metal designs.
Premium performance
Thanks to its 4mm aluminium composition, every splashback is fire-resistant, waterproof and anti-scratch, making it perfect for use behind any hob or sink and easy to maintain for homeowners.
The splashbacks can be easily cut, drilled and shaped to fit required measurements using standard tools. The installation should be hassle free too as they can be installed directly onto a pre-existing surface or on top of tiles with little preparation needed.
As an added bonus, when installed and used in line with Bushboard’s installation instructions and accessories, Alloy splashbacks are covered by a lifetime guarantee.
An installation guide
The following is an installation process from Bushboard that should be followed. Before you begin, make sure all electrics have been disconnected as a safety measure and check the hob manufacturer’s guidance on the safe distance for install.

Wall preparation: Make sure the surface is flat, clean and debris-free. If an existing upstand is in place, make sure you remove any existing sealant first. Once this has been done, check for any wall imperfections, bumps or dust, using a combination of scraper and sanding board to remove any debris and smooth the surface. Brushing off any dust will ensure no issues are encountered when applying the adhesive later on.

Measuring: Measure the opening where the hob panel or wide splashback needs to sit, then mark this measurement on the top, middle and bottom of the panel itself. If the panel needs to be shaped around sockets or upstands, ensure these measurements are also marked onto the rear of the panel.

Cutting: PPE is a must when cutting the panel, so please ensure this is taken into account. Using your plunge saw and guide rail, trim away the amount required, taking the sharpness off the edge by deburring using a sanding block. Wipe the splashback down with a microfibre cloth.

Dry-fitting: Remove the backing from the splashback panel, marking the top of the panel so the orientation remains as intended. From there, place the panel in position to ensure it fits the space as intended, and be sure to note the alignment of any features such as plug sockets or upstand corners.

Adhesive application: Mark 40mm around the perimeter of the panel as all adhesive needs to sit inside this zone. Cut a 5mm hole in the adhesive nozzle and apply a reasonable covering in a zig-zag pattern.

Fitting: Once the adhesive is applied, push the splashback into the desired position, firmly, ensuring all areas are pressed in. Insert spacers to avoid the panel from slipping into the sealant gap. The panel will take 2-3 hours to fully adhere to the surface.

Sealing: Apply a thin bead of sealant and smooth out. Allow for it to cure and your install is complete. Any sockets removed prior to installation can now be replaced and the power switched back on.
To find out more about the Bushboard Alloy range, visit Alloy Splashbacks at Bushboard.